AP3 (Contactless Reader)
This is a guide to get you started with the Quest AP3 Contactless Reader. Please read and understand it completely before using the Quest AP3.
Box Contents
- Quest AP3 Card Reader
- USB Cable
- Wrist Lanyard
- Support information card
Key Features
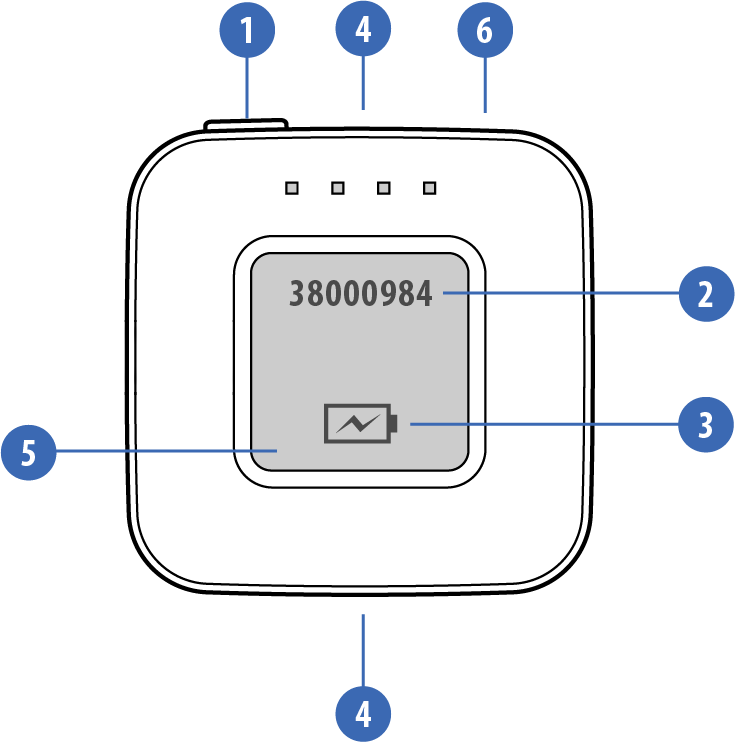
| 1 | Power / Sleep Button |
| 2 | Serial Number |
| 3 | Battery Indicator |
| 4 | Lanyard Attachment |
| 5 | eInk Display |
| 6 | USB Charging Port |
Wrist Lanyard
The AP3 lanyard can be a convenient aid to pull the AP3 out of your pocket, or to put over your wrist, freeing your hands to hold other objects.
Your AP3 should let you attach the lanyard at the top or bottom, although some early units allow you only to attach it at the bottom.
The easiest way to attach the lanyard is to:
- Unclip the lanyard by squeezing the clip at its base.
- Remove the back-plate of the AP3 by running a finger nail around the back-plate - it's easiest to do this starting at the power button.
- Thread the lanyard cable through either the top or bottom holes on the AP3 back-plate by inserting from the outside of the back-plate first, then back out through the corresponding hole.
- Pass the lanyard clip through the hole in the cable and then re-connect it to the rest of the lanyard.
- Your lanyard should now be attached to the back-plate and you can now re-attach the back-plate by simply pressing it onto the back of your AP3. Make sure the battery is still in place while you do this.
- Success!
To detach the lanyard, you can simply follow the above instructions in reverse.
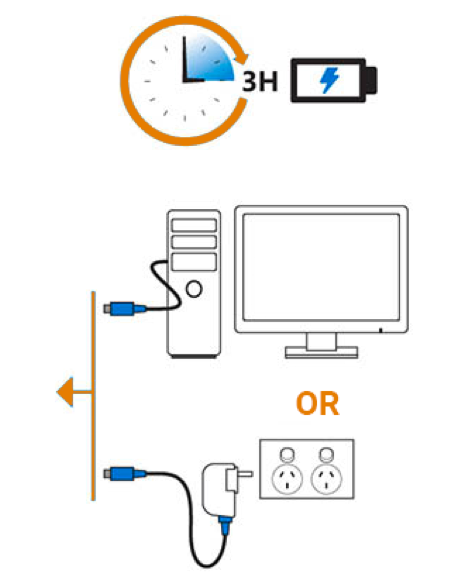
Charging
Before its first use, please fully charge the AP3. Connect the provided USB cable into a computer's USB port, or plug the cable into a 5V USB Power Adapter connected to an AC (Mains) power outlet and turn on. Now, connect the micro USB end of the cable into the AP3. The AP3 will turn on when charging, this is normal. A full battery charge will take approximately 3 hours.
Warning
Output from Power Adapter must not exceed 5V.
Power adapter compatibility
5V USB Power Adapters are readily available for purchase from most electronics retailers, alternatively, you can purchase a 'Quest Certified' 5V USB Power Adapter directly from Quest. Contact Quest for more information.
Battery
The AP3 is fitted with a 340mAh Lithium Ion Battery. To maximise the Battery life span, avoid full discharges and charge the battery more often.
Partial discharge on Li-ion is fine; there is no memory effect and the battery does not need periodic full discharge cycles to prolong life.
Danger
Do not store the device for extended periods with a depleted battery. Doing so may result in permanent damage to the battery or the device.
Battery life
Below is an estimate of the battery life of the AP3 card reader under certain conditions. These estimates are based on the performance of new, fully charged batteries.
| State | Activity | Battery life |
|---|---|---|
| Active | transactions performed by tap | 200 Transactions |
| Idle | the AP3 is in an idle state | 2 days |
| Off | the AP3 is powered off | 6 months |
Replacing the battery
If required, a new Battery can be fitted by the owner. Only use genuine Quest replacement batteries.
Status Indicator
When the device is ON and idle, the Battery Status will be displayed in the top right hand corner.
| Status | Storage Information | |
|---|---|---|
 |
Battery fully charged | Can be stored untouched for 6 months. |
 |
Battery partially depleted | Should be charged before long term storage. |
| Battery depleted | Must be charged before storage. | |
 |
Battery charging | |
| OFF | Card reader is turned off | Check battery before storing. |
Warning
If storing the device for longer than 7 days, fully recharge the device, followed by a recharge every 6 months.
Power Button
The power button is located at the top of the AP3.
Turning On
Press and hold the power button for 3 seconds until you hear a beep tone, then release the button. The eInk display will turn on.
Turning Off
Hold the power button for 3 seconds until your hear a beep tone, then release the button. When turned off, the AP3 will display OFF on the screen.
Note
You will need to wait 5 seconds after turning off before attempting to turn the AP3 back ON.
Troubleshooting
Because the AP3 uses an eInk display, if something goes wrong then it is possible for the display to appear to be on even when the AP3 is off. If the AP3 is not responding then follow these steps:
- Hold down the power button for 10 seconds to force it to turn off (don't worry if the screen still appears to be on)
- Next, hold the power button for 3 seconds to turn the AP3 back on
- If this doesn't work then the AP3 might be out of power, in this case plug in your micro USB cable and charge it
Care
Regular cleaning is recommended and care should be taken to avoid excessive dust / dirt/ fluff / moisture.
Cleaning
Turn off the AP3 before cleaning. Use a clean, micro fibre cloth to gently wipe the display when required.
Danger
Avoid getting moisture in openings. Do not use window cleaners, household cleaners, aerosol sprays, solvents, ammonia, or abrasives.
Cautions
Before operating the AP3, read and understand all instructions in this guide.
- Do not use the AP3 whilst in control of a vehicle.
- Do not use this equipment in an extreme environment where high temperature or high humidity exists.
- Do not leave this equipment in a vehicle in direct sunlight.
- Do not drop, knock or shake the AP3. Rough handling could damage internal circuit boards and mechanics.
- Do not expose this equipment to any liquid.
- Avoid contact with other metal objects (eg. keys/coins in pocket) to avoid unsightly scratches.
- Avoid activating buttons with long, pointed fingernails.
- Avoid charging the Battery in strong heat or extreme cold environment. The battery performs optimally in an ambient temperature of 0°C to +45°C.
- Do not store the Battery near a fire or heat source.
- Never try to open the Battery as it contains substances that may be harmful if swallowed or when allowed to come into contact with unprotected skin.
- Never short-circuit the Battery, as it may overheat and cause a fire. Keep it away from jewellery and other metal objects.
- Never dispose of the Battery in a fire. It could explode and release harmful substances into the environment.
- Never dispose of the Battery with your regular waste. Speak to your local authority about Battery collection.
- Storage - Store the AP3 in a cool dry place. If in long term storage, the battery must be fully charged before storage, and the battery level must be periodically checked and recharged every 6 months to avoid damage to the AP3, or its battery.
- Do not disassemble the AP3 or its accessories. If service or repair is required, contact Support to organise for the unit to be returned. If the unit is disassembled this will void the warranty and will render the device inoperable.
Lost or Stolen Devices
If your AP3 gets stolen, please call the Support team immediately for remote deactivation. Acting promptly will help to reduce any potential for fraud.
End of Life
At end of life, your AP3 must be returned for secure disposal. The AP3 contains sensitive bank details. Contact the Support team to arrange for your AP3 to be returned and disposed of securely.

Warranty
Quest Payment Systems Pty Ltd warranty information can be found here.